Glass oil burners are a unique and beautiful way to bring warm, inviting light into your home. Glassblowing is an ancient art form that has been around for centuries, and creating a glass oil burner is a great way to get started. In this guide, we will discuss the steps and techniques for blowing a glass oil burner.
Step 1: Gather the Materials
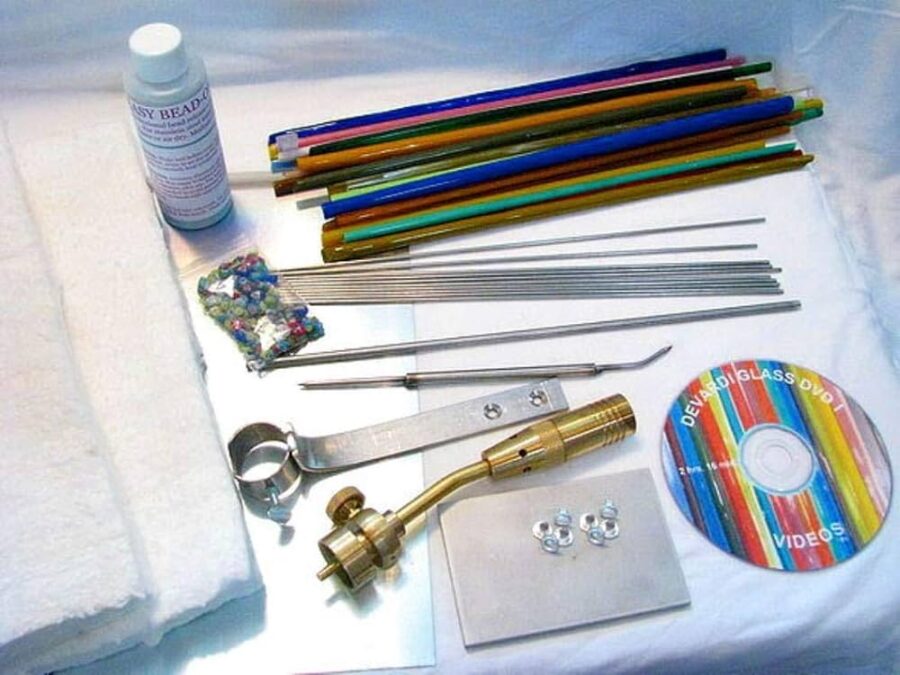
Before you begin, you will need to gather the materials you need for the project. You will need: a glass-blowing torch, a glass-blowing tube, glass-blowing pliers, glass-blowing shears, and safety glasses.
Step 2: Heat the Glass
Using your glass-blowing torch, heat the glass-blowing tube until it is glowing orange. Carefully move the tube around the flame to ensure that it is evenly heated.
Step 3: Form the Glass
Once the glass is hot enough, use the glass-blowing pliers to shape the tube into the desired shape. You can use the pliers to roll, bend, and twist the glass into the desired shape.
Step 4: Make the Opening
Once you have the desired shape, use the glass-blowing shears to make a small opening at the top of the glass. This will be the opening for the wick of the oil burner.
Step 5: Cool the Glass
Once the opening is made, allow the glass to cool completely. If the glass is still hot, it can easily shatter or crack.
Step 6: Add the Wick and Oil
Once the glass is cool, add the wick and fill the oil burner with the desired oil.
Conclusion
Glass oil burners are beautiful and unique pieces that add a special touch to any home. Now that you know the steps and techniques for blowing a glass oil burner, you can begin creating your own. Good luck!
1. Blowing: This is the most common method of shaping a glass oil burner. A glass blower will use a blowpipe, a long metal tube with a mouthpiece, to blow air into molten glass, which is heated at a temperature of around 1,400°F. The glass blower then shapes the molten glass with a variety of tools.
2. Frit Casting: This method involves using a mold to shape the glass. The molten glass is poured into the mold and allowed to cool and harden. The finished product is then cut, sanded, and polished.
3. Lampworking: This method is similar to blowing, but it is done with a smaller torch and special tools. The glass is heated to a lower temperature and then manipulated with tools to shape the glass into a desired form.
4. Slumping: With this method, the glass is heated and then placed over a mold. The heat causes the glass to slump and take the shape of the mold.
5. Cold Working: This method involves shaping the glass while it is cold. It is done with a variety of tools, such as saws, grinders, and files. The cold-worked glass can be polished to a high shine.
Blowing Hot Glass: A Step-by-Step Guide to Glass Blowing
Blowing Hot Glass: A Step-by-Step Guide to Glass Blowing is an instructional guide written by experienced glassblower, Matt Jones. The guide provides detailed instructions on the basics of glassblowing, including tools and techniques needed to create glass objects. It covers topics such as heating and shaping the glass, creating and attaching handles and spouts, and finishing touches. The book also includes detailed illustrations and photographs to help demonstrate each step. The guide is intended for beginners, but also provides helpful tips for more experienced glassblowers.
Equipment Guide for Glass Blowing: What You Need
Equipment Guide for Glass Blowing: What You Need
1. Glass Blowing Furnace- This is the most important piece of equipment you need for glass blowing. It is used to heat the glass to a molten state so it can be worked with.
2. Marver- This is a flat surface used to shape the glass. It is also used to cool the glass down before it can be worked with.
3. Blowpipe- This is a hollow tube used to blow air into the molten glass.
4. Bench Burner- This is a type of torch used to heat the glass in the blowpipe.
5. Punty- This is a metal rod used to shape the molten glass.
6. Tweezers- These are used to pick up and move small pieces of glass.
7. Graphite Crucible- This is a container used to melt glass in the furnace.
8. Forming Tools- These are tools used to shape and manipulate the glass.
9. Safety Gear- This includes safety glasses, gloves, and a face shield.
10. Ventilation- Proper ventilation is essential for safety when working with hot glass.
artistry
This article was a great resource for anyone looking to learn the basics of glass artistry. It provided clear instructions and helpful visuals to aid in the learning process. With the steps provided, anyone should be able to create a beautiful glass oil burner. I recommend that anyone interested in learning this art form take their time and practice patience when attempting to complete the project. With enough practice and dedication, anyone can become a master glass artist.